
Getting started with Git
Published by Kaustubh Saha on March 22nd, 2021
Git is a distributed version control system - unlike traditional version control systems like CVS or SVN where there's one repository where everyone works ( check out something, make changes and push it back to the same repository) git follows a distributed model, where instead of a single repository, every developer gets their own local repository with a complete history of projects and commits - thus allowing developers to work offline if needed. Having a full local history makes Git fast since it means developers don’t need a network connection to create commits. The local repository resides on the developer's machine while the remote repository is a more professionally managed repository hosted on an on-premises or cloud datacentre and is the golden source of the data. The local and remote repositories can be synchronized anytime the developer wants.
Distributed development also makes it easier to scale your engineering team. If someone breaks the production branch in SVN, other developers can’t check in their changes until it’s fixed. With Git, this kind of blocking doesn’t exist. Everybody can continue going about their business in their own local repositories independently.
Git essentially manages versions of project contents - each version of a project is called a commit. A commit is essentially a snapshot of the project. All commits belong to a branch. The default branch is called master. A request to merge one branch into another is termed as a pull request.
Git supports both command-line interfaces as well as GUI. Lots of Git GUI are available - SourceTree is one of the most popular. Though developers often tend to prefer using the command line to interact with Git
Most git commands follow the following syntax:
git [command] [optional flags supplied using -- or -] [arguments if needed]
For example, to check if git is installed on a server, use:
$ git --version
In order to get help from Gyn regarding a command syntax, we can use:
$ git help [command]or$ git [command] -h
When we start with git, it's often a good practice to configure user information first. Here's how we can do it:
$ git config --global user.name "Jon Snow"$ git config --global user.email "jon.snow@nightswatch.com"
The --global argument here indicates that the settings apply to every repository for the currently logged in user. If you want to configure for every repository and every user, use --system instead
It's also a good idea to specify the editor that we want to associate with git. This editor will be used for git commit messages
$ git config --global core.editor notepad
We can also use the git config command to see the value of a config property - we just need to pass the config property name as an argument:
$ git config user.name
to check all the git configs, use:
$ git config -l
To create/initialize an empty git repository at the current location use:
$ git init
When a local git repository is created, git maintains the following metadata information about the repository:
- working tree : The working tree, or working directory, consists of files that you are currently working on. You can think of a working tree as a file system where you can view and modify files
- staging area/index: The index, or staging area, is where commits are prepared. The index compares the files in the working tree to the files in the repo. When you make a change in the working tree, the index marks the file as modified before it is committed.
- local repository: the version history for the local repository
This information is typically maintained in a hidden directory called .git inside the project root directory
To find the status of the current repository, use:
$ git status
It shows us the status of the current repository ( whether it's in sync with the remote repository or not ) and also shows the status of working tree/staging area since the last commit. All the modified files are grouped into two categories:
- tracked: Tracked files are files that were in the last snapshot; they can be unmodified, modified, or staged. In short, tracked files are files that Git knows about.
- untracked: Untracked files are everything else — any files in your working directory that were not in your last snapshot and are not in your staging area
To add a file or directory to the staging area:
$ git add [file or directory to be added]
Note that adding a directory automatically adds all the files inside it ( So git add . would add all files)
To commit changes, use:
$ git commit -m "this is a commit message"
If you don't specify the -m option and have a default editor associated with git, git will automatically open that editor in order for you to type in the commit message
Note that commit just commits to the repository and doesn't move the changes to the remote repository
Sometimes we might want to skip the staging area
Use the following command to add all files to the staging area and then commit:
$ git commit -a
Note that this doesn't work with new untracked files - we still need to explicitly add them to the staging area using git add
to view the history of commits on the local repository, use:
$ git log --oneline
--oneline option tells git to display one commit per line in the output
To view the most recent N number of commits, use:
$ git log --oneline [N]
By convention, remote repository names end with .git.
To view information about the remote repository, use:
$ git remote --verboseor$ git remote -v
This will display the remote repository URL (corresponding to this local repository)
Git has a few handy aliases defined for convenience:
a) origin: origin is the alias for the corresponding remote repository inside a local repository
b) HEAD: HEAD is the alias for the commit representing the currently checked out snapshot of your project. It is essentially a pointer to the current commit. Only one HEAD can exist per local repository
By default, the assigned name for remote repo is origin
So the following command will display information about the remote repo:
$ git remote show origin
To create a local repository from a remote one, simply clone the remote repo:
$ git clone [remote repo URL] [optional local repo name]
This might prompt you for login credentials.
Git supports a number of authentication options apart from entering your credentials every time:
- use an SSH Key pair so that the remote repository recognizes this host
- use a credentials helper ( and Git comes with a built in credentials helper) which caches credentials for a time window
$ git config --global credential.helper cache
This will keep your login credentials cached for next 15 mins
If you have started with a local repo, have committed changes there and now want to link it to a remote repo, use:
$ git remote add [repo name] [remote repo URL]
In order to move commits from local repo to remote repo, use the following commands:
$ git push [optional remote repo name] [optional URL]
Git will allow it only if results in a fast-forward merge ( and we'll dive deeper into fast-forward merge in this article ) unless you use the --force flag. Do not use the --force flag unless you’re absolutely sure you know what you’re doing.
Sometimes we might want to download all the commits from the remote repository to local but not merge them yet. In such cases use:
$ git fetch [optional remote repo name] [optional branch name]
But typically we would want to download changes from remote as well as merge them into working tree. This is done using:
$ git pull [optional remote repo name] [optional branch name]
Git models every commit as a directed acyclic graph. Each node in the graph represents a commit and each directed edge points to its parent commit ( the commit just before itself )
A branch in git is essentially a situation where a commit has more than one child:
![1. Understanding Git - Git Pocket Guide [Book]](https://cdn-images.postach.io/51e57b9d-339d-4e86-bab5-064f273e46b9/8fc520aa-364b-4f58-bbbb-1d601e612345/7287823c-6fb8-4778-ac31-5c877d6ecceb.png)
For example, in the diagram above, clearly both commit X and D have the same parent C. This is what identifies a branch in Git. It also represents an independent line of development in a project. In Git, a branch is just a pointer or a label to a particular commit.
A merge represents the exact opposite scenario - when a commit has more than one parent
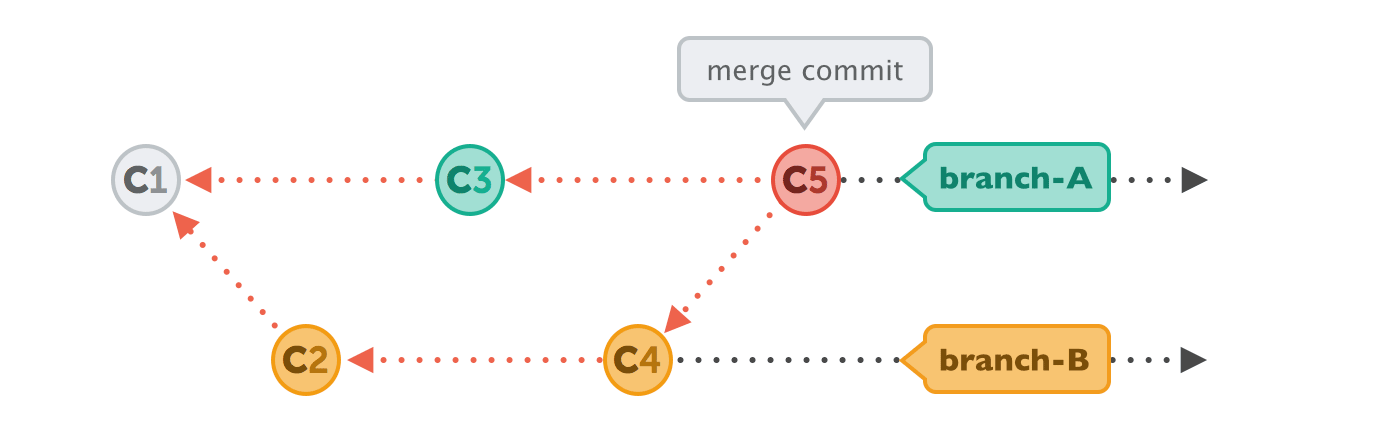
For example in the diagram above, commit C5 represents a merge of branch B into branch A
Git also allows you to view the commits in your local repository as a graph. You can do so using the following command:
$ git log --graph --oneline
to list all the existing branches (in local repository) use:
$ git branch
In order to create a new branch, use:
$ git branch [branch name]
Note that this new branch will be created based on current HEAD. The newly created branch will be available only on local repository until you explicitly push it to remote. Note that creating a branch essentially means creating a new label pointing to current HEAD
In order to update your working tree as per an existing branch, use:
$ git checkout [branch name]
checkout essentially updates the HEAD reference ( eg from the master branch to featureX branch ) and also updates the working tree files.
Often, we need to create a new branch and also switch to it. There's a shortcut to it - instead of having to run both git branch and git checkout, we can simply run;
$ git checkout -b [branch name]
This will create a new branch and also switch to it.
Its also possible to checkout an older commit instead of checking out a branch. This creates a detached head ( a situation where HEAD no longer points to the top of the current working Tree)
$ git checkout [commit id]
In order to delete a branch, we can use;
$ git branch -d [branch name]
Note that deleting a branch essentially means deleting a label. Normally no files are deleted. So, this command will work successfully only as long as all the changes in this branch have been merged to another branch ( In other words, only if this branch label doesn't point to a leaf node in the directed acyclic graph representing the git repository).
In order to perform a force delete, use
$ git branch -D [branch name]
Note that force deletes can potentially cause data loss. Force deletes create dangling commits. Git internally periodically checks for and garbage collects dangling commits
Every object (eg; a commit or a tag ) in Git has a unique identifier called the Git id. The Git id is a 40 digit hex number and is the result of an SHA-1 hashing. SHA-1 values are based on content and are designed to avalanche - so the same content always produces the same SHA-1 value but even a minor difference in content can cause a huge difference in the SHA-1 values. This means Git has a very easy and fast way of knowing whether the files have changed or not
To view a git object;
$ git show [git id]
Since HEAD is essentially a reference to a commit id, git show HEAD works fine too
Git also provides shortcuts for referencing prior commits
~ : shortcut for parent commit (parent node on the DAG)
~~ : shortcut for parent's parent
~N : shortcut for nth parent ( ~ is same as ~1 and ~~ is same as ~2)
To see the commit just before HEAD;
$ git show HEAD~
To see 3rd parent of HEAD;
$ git show HEAD~3
But what about merge commits ? Merge commits have multiple parents. For example, if we merge master to branch featureX, the tip of featureX will have two parent commits - one pointing to the previous tip of featureX and other pointing to tip for master
For merge commits, git has the ^ notation
^ : first parent of commit ( ^1 works as well )
^2 : second parent of commit
$ git show HEAD^1
Note that the ^ notation works only with a merge commit
A reference in Git is a pointer to SHA-1 hashed Git id or pointer to another reference ( in such cases its called a symbolic reference). Branch labels in Git are essentially Git references pointing to the most recent commit in the branch (i.e. the tip of the branch ). Git also supports another type of references called tags. A tag is also a reference pointing to another commit. It is typically a user friendly and human-readable label for a commit and is used to mark important commits.
To view all tags in the repository, use;
$ git tag
git show command works fine with tag names as well
$ git show [tag name]
Git supports two types of tags;
- annotated tags: contains additional metadata, can be signed
- simple tags: lightweight tags
Annotated tags are meant for releases whereas lightweight tags are meant for private or temporary object labels. Annotated tags can contain a message, creator, and date different than the commit they point to. So you could use them to describe a release without making a release commit. Lightweight tags don't have that extra information, and don't need it, since you are only going to use it yourself to develop.
By default, git creates lightweight tags unless you explicitly tell git to create annotated tags using the -a option
To create a new simple tag;
$ git tag [tag name] [optional commit id]
Note that the commit id is optional and by default points to the current HEAD
To create a new annotated tag;
$ git tag -a -m [some human-readable message] [tag name] [optional commit id]
Note that git push doesn't automatically transfer the tags to the remote repository. A tag has to be explicitly pushed to remote repo.
To push a single tag to remote:
$ git push origin [tag name]
To push all tags from local to remote repo;
$ git push origin --tags
Let's have a deeper look into git merges. A merge essentially combines the work of two or more independent branches. Typically merge involves merging a feature branch (or short-lived branch) into a long-running merge. Conventionally, the source branches are often deleted after a merge especially if they are short-lived branches)
Git supports 4 types of merges;
- fast-forwarding branch
- merge commit
- squash merge
- rebase
Fast forward merge:
A fast forward merge can occur when there is a linear path from the current branch tip to the target branch.
For example, consider the commit graphs in the image below. Feature branch contains some commits that are not available in master. There are no other changes in master branch after the feature branch was created. So, all git has to do as part of merge is to move the master label to point to the same commit as the feature branch label. This is the simplest merge scenario
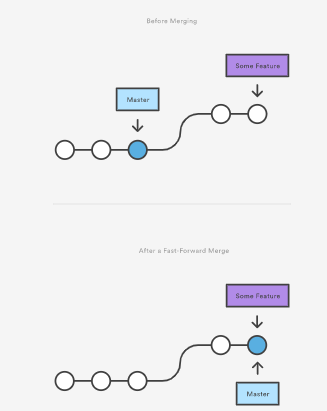
All we have to do in this case is;
1. update the working tree as per target branch
$ git checkout master
2. Merge source branch to target branch using git merge ( git merge attempts a fast forward merge first by default )
$ git merge [some feature]
3. Commit the changes
$ git commit -m "some meaningful description"
4. delete the feature branch ( not required but good practice )
$ git branch -d [some feature]
Merge Commit:
Combines the commits from source and target branch into a single merge commit. In this case, the merge commit will have multiple parents after the merge. If both branches have changed in the same file, this might potentially cause a merge conflict
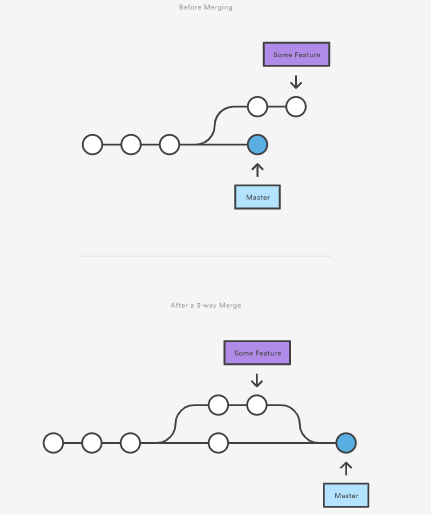
From user's point of view, the steps remain the same;
1. update the working tree as per the target branch
$ git checkout master
2. Merge source branch to target branch using git merge
$ git merge [some feature]
Since git tries fast forward merge by default, if you want to use merge commit despite fast forward merge being possible, you need to tell git explicitly to not use fast forward merge. This is done by using the --no-ff flag
$ git merge --no-ff [some feature]
3. Commit the changes
$ git commit -m "some meaningful description"
4. delete the feature branch ( not required but good practice )
$ git branch -d [some feature]
When you perform a merge with a merge commit, git takes on the responsibility of combining the work of multiple branches and placing the results into a single merge commit> However if multiple branches make different changes to same part of a file and git cant automatically resolve it, the file will be reported as a merge conflict and will have to be manually fixed
Decoupled modular applications are ideally likely to have fewer number of merge conflicts. In a way, frequency of merge conflicts is also an indicator of the quality of the software and the development practices. In gitspeak, part of a file is called hunk. A merge conflict occurs when two branches change the same hunk in different ways. To make merging easier, go for smaller and frequent merges
steps;
1. update the working tree as per target branch
$ git checkout master
2. Try merging source branch to target branch using git merge
$ git merge [some feature]
3. Fix the merge conflict manually
4. Add the fixed file to staging area using git add
$ git add [manually merged file]
5. Commit the changes
$ git commit -m "some meaningful description"
6. delete the feature branch ( not required but good practice )
$ git branch -d [some feature]
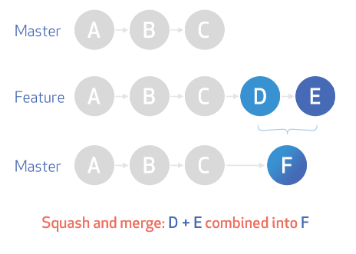
Squash merge:
Squash merging is a merge option that allows you to condense the Git history of topic branches when you complete a pull request. A simple way to think about this is that a squash merge gives you just the file changes, and a regular merge gives you the file changes and the commit history. Squashing lets you tidy up the commit history of a branch when accepting a merge request.
The following image shows the impact of a squash merge. A squashed merge essentially produces a commit on the destination branch without marking any merge relationship. This is useful if you want to throw away the source branch completely or don't care about the commit history in the source branch
For example, in the image below we have commits D and E on the feature branch. Merging them to master using squash option produced a new commit F with no relation to D and E
steps;
1. update the working tree as per target branch
$ git checkout master
2. Try merging source branch to target branch using git merge
$ git merge --squash [some feature]
3. Commit the changes
$ git commit -m "some meaningful description"
4. delete the feature branch ( not required but good practice )
$ git branch -d [some feature]
Rebase:
Rebasing is the process of moving or combining a sequence of commits to a new base commit. Rebase also produces a squashed commit just like squashed merge but unlike squashed merge, which doesn't touch or impact your source branch at all, rebase allows you to clean up history on the source branch itself. Essentially rebase rewrites commit history and moves commits to a new parent
Git supports two types of rebasing:
- standard :
default option. automatically takes the commits in your current working branch and applies them to the head of the passed branch (as an argument)
$ git checkout [some feature]$ git rebase master
This operation works by going to the common ancestor of the two branches (the one you’re on and the one you’re rebasing onto), getting the diff introduced by each commit of the branch you’re on, saving those diffs to temporary files, resetting the current branch to the same commit as the branch you are rebasing onto, and finally applying each change in turn.
- interactive
Instead of blindly moving all of the commits to the new base, interactive rebasing gives you the opportunity to alter individual commits in the process. This lets you clean up history by removing, splitting, and altering an existing series of commits
To enable this we need to pass --interactive flag to git merge
Opens a text editor with a list of all commits on that branch - each on a different line. The first word of each line indicates what to do with thatommit
- pick : use the commit
- reword: use the commit but edit the commit message
- squash: use the commit but don't show as a separate commit
Git also provides an easy way to change the most recent commit ( This includes changing the commit message as well as changing the files ) using the --amend flag
Amending last commit message:
$ git commit --amend -m "some meaningful message"
Amending contents of last commit
$ git add [some file]$ git commit --amend --no-edit
the --no-edit tells git that you aren't interesting in changing the commit message and only want to change the commit files
Tracking Branch:
Git also uses the concept of tracking branches. A tracking branch is essentially a local branch that represents a remote branch. A 'tracking branch' in Git is a local branch that is connected to a remote branch. When you push and pull on that branch, it automatically pushes and pulls to the remote branch that it is connected with. Cloning a remote repository automatically creates a tracking branch for master.
To change default remote tracking branch, use:
$ git remote set-head [remote repo] [branch name]
Tracking branches act as intermediaries between local and remote repo. They are not impacted by local command and are impacted only by network commands. The network commands are those git commands that interact with the remote repository. Namely:
- clone
- fetch
- pull
- push
Note that git pull can also result in a merge situation. We can control merging options by passing either of the following merge flags to git pull:
--ff : fast forward ( default option )
--no-ff : always use merge commit
--ff-only : cancel ( do not merge) if fast forward merge isn't feasible
--rebase : rewrite history
The flags work in the same way as with git merge
.gitignore file
This file is used to specify rules to tell git which files to skip tracking for the current repository. It essentially helps us reduce noise or clutter in the repository. The typical use cases for files to be included here are:
- compiled binaries
- OS generated files
- IDE generated files
- 3rd party Libraries
- logs
Here are some of the rules for making entries in gitignore:
- a blank line matches no files - often its used just as a line separator for readability
- If a line starts with #, it is treated as a comment and git ignores it ( if # is part of a pattern, escape it with \#)
- All trailing spaces are ignored
- A prefix of ! negates a pattern. For example:
*.txt!abc.txt
The first line says exclude all .txt files while the second line tells that abc.txt is an exception and hence shouldn't be ignored
If ! needs to be part of a pattern, escape it with \
- / is used as directory separator
- if / is at the beginning or middle or both, then the path has to be interpreted as relative to .gitignore file level
Else ( if no / in the pattern), the match applies to all directories
- If / is at the end of a pattern, it can only match a directory
eg foo/bar/ matches foo/bar directory but not a file of the same name and at the same location
- * matches any number of characters ( except a /)
- ? similar to * but its a placeholder for only a single character
- ** matches against a full path name
- Leading **
**/foo matches abc/foo as well as abc/foo/bar
**/foo/bar matches abc/foo/bar as well as abc/baz/foo/bar
- Trailing **
matches everything inside a directory
eg. foo/** matches all files inside foo
- Middle **
matches zero or more directories
eg foo/**/bar matches foo/bar or foo/baz/bar or foo/baz/fizz/bar

Posted on March 22nd, 2021